Crash Course in Creating a Podcast
This is a quick guide to starting your own fiction podcast. It focuses on simplicity, getting you running quickly, and not duplicating information that’s already out there in a superior form. It comes in four parts.
1. Bona fides
2. Tools
3. Technique
4. Publish
1. Bona fides
I’m Eneasz Brodski. I produce the Methods of Rationality podcast. It began as me, in my bedroom, with a lot of enthusiasm and a handheld mic after a few hours of research. As of this writing it’s been 6.5 years since I started. I’ve spent over 10,000 hours working on this podcast, I’ve produced over ninety hours of audio fiction spread across 185 episodes, totaling almost 4.5 million downloads. I’ve been a finalist for the Parsec Awards three times. I’ve never done professional audio work, but I have some idea of how to get an amateur podcast going.

2. Tools
2.a. Source Material
Obviously you need some source material. Choose wisely. :) It is best to have it in hard copy, and if possible on loose leaf paper. This allows for maximum flexibility, which you may want in order to get an ideal distances from the microphone.
2.b. Recording Hardware
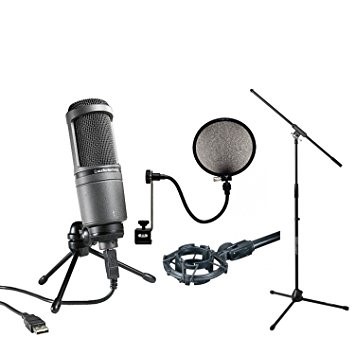 If you plan on doing more than a dozen episodes, it’s worth it to shell out the money for a mid-grade microphone. They make a hell of a difference. I use an Audio Technica 2020, with a USB converter.
Do be gentle with them, they are very sensitive, you will be sad when you have to buy another one after six months because of rough treatment.
Get a microphone stand, so you don’t have to hold the mic and it stays a constant distance from your mouth.
Get a sheet-music stand to hold the source material. Reduces strain, and prevents the paper rustle that the mic will pick up, ruining your beautiful narration.
Get a pop-filter, to prevent the worst of those annoying pops from plosives (air coming from your mouth pushing on the delicate microphone pick-ups.)
I’m less sure of the spider-mount, to prevent pops and distortion from jostling of the microphone or its stand. I’ve found it helps enough to justify the cost, if you’ll be doing this for a long time. Some come with a pop-filter integrated, which helps defray the cost.
2.c. Recording Environment
 Echo is your greatest enemy! It’s a stealthy degrader of audio quality that you don’t notice when you record, it’s hard to eliminate IRL, and it’s almost literally impossible to eliminate via software in post (some of the extremely high-end audio software claims to be able to get rid of some echo).
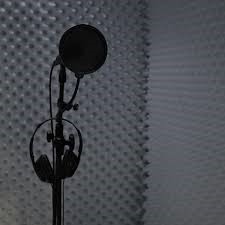
The best fix is recording in a closet. All those hanging clothes do *wonders* to absorb sound. Put egg-crate foam on the wall opposite you to nullify echo from that direction. This makes a big difference.
Minimize all background sound, these mics will pick up everything. Refrigerators, HVAC, even loud computer fans. So don’t record where you can hear a fan or refrigerator, and keep your computer as far away as possible—around a corner if you can. Turn off the heating or AC before you begin. Be aware of noise you can’t control, a truck driving by outside can be picked up. You’ll have to wait until it’s gone and then redo that sentence.
2.d. Recording Software
For software, do your recording and editing in Audacity. It’s free, and plenty powerful for anyone who isn’t an industry professional. Plug in, hit record, and go. Save every now and then while you’re recording, and of course once when you’re done.
3. Technique
3.a. Recording the audio
Do not touch the paper at any time that you are speaking.
Modulate your breathing. That’ll save you a ton of post-production work. Plan when you will breath beforehand–make sure it’s only at natural breaks in a sentence, like commas and periods. Take a full breath when you reach the end of a page before flipping it.
Beware of throat phlegm, do your best to keep it clear, unless that’s the sound you’re going for. You’ll eventually figure out what works best for you to accomplish that.
When you flub a word and have to redo it, go back AT LEAST a few words. You need to get a nice flow and find natural breaks in speaking to splice the lines together, and in practice these very rarely occur between words. They’re more common in the transition from vowels to hard consonants. Best practice is to go back to the last natural pause – either a period or a comma – and continue from there. I always do so, and it’s invaluable.
Don’t be afraid to do a few takes if something doesn’t feel right and cut out all but the best one.
You’ll probably read too fast. Most people do. You should probably slow down.
Don’t worry about over-acting. That’s almost impossible when you only have your voice to convey emotion, rather than face, body, etc. It’s far more likely that you’re being too flat than that you’re overacting.
3.b. Processing the audio
Keep the original raw file when you’re done, and do all your post-production work in a renamed copy, in case you screw something up real bad.
First thing you do before you start anything else in post-production is to run a Noise Reduction on the entire thing. It’ll make every type of editing easier, as the background hiss will be reduced. Heck, you may want to do it twice.
The BIGGEST THING I WISH I KNEW FROM THE START is this: Whenever making edits in Audacity, always “jump to zero” after selecting the section you want but before doing ANYTHING ELSE. The hotkey for this is “z”. It’s the *best thing ever*!! Seriously, hit Z anytime you highlight any amount of track for any reason, or are about to paste something in. Make it a habit. Find yourself accidentally hitting Z after selecting text to copy out of an email or webpage, because you have such entrenched muscle-memory of “Releasing Mouse Button After Selection -> tap Z.” It’ll put a stop to so many of your post-production pops/clicks.
Name all your audio tracks, it makes it easier to keep track of them.
Don’t forget to leave time-lock off when layering tracks, or you may accidentally delete snippets in the track you aren’t working on.
I don’t know why most fiction podcasts don’t utilize the simple expedient of putting a page-flip sound effect between sections (such as POV shifts, or time jumps). I have a hard rule that anywhere in the source material where there is a visible line-break separating sections, I put in a page-flip to signal that to the listener. FreeSound.org has tons of free sound FX you can use, as long as you aren’t doing using them for commercial purposes. Failing that, you can make your own page-flip sound effect. You have paper, and a microphone, you have all the tools you need!
Also consider that anytime the font changes in the source material, that is a signal to the reader, and your listener should get a signal of some sort as well. If it’s a different font to delineate a letter, put a pencil-on-paper SFX in there. If it’s a text message, put in tapping-on-keyboard SFX. If it’s to denote a flashback, add an echo effect (it’s a simple option in Audacity’s Effect menu) This really does make a good bit of difference, and increases ease of listening.
It’s likely you’ll want to increase the volume a decent amount. Your audience can always turn down the volume if it’s too loud, but there’s only so much they can turn it up if it’s too quiet, and that’s often not enough. They’ll be listening in cars and other noisy environments, don’t make it hard for them to hear you. Don’t go overboard though, it is possible to be too loud in a way that distorts the audio.
Finally, when you’re all done, save, and then Export as MP3. You may have to download a plugin to do that, simply google “Export to MP3 in Audacity” and follow the instructions once. After that it’ll be easy.
Choose a simple file naming convention that consists of your title or abbreviation with and no spaces, followed by an underscore and three digits, starting with 001. Every time you create another episode, iterate the number. This will keep things easy and simple for you. EG: MyPodcast_001.mp3
4. Publish
The essence of a podcast is two things:
1. MP3 audio files, which you will create. These are the files that contain the actual sound.
2. An RSS feed, which is how people get your MP3 files. This is a file which is updated every time you broadcast another episode. It lists all your available episodes, and where they can be found, in a way that podcast apps can read so they can bring the episodes to your listeners.
The server where your MP3 files are stored and the address of the RSS feed that tracks them is your home.
Everything else is secondary. Later on you’ll likely want a cool landing webpage, but first you must create this structure. I am a strong advocate of getting started simply, quickly, and cheaply, and growing as you learn your craft and build your audience.
4.a Find a Host
A good home for beginning podcasters is LibSyn. It’s cheap and easy to use. It’s been around for ages, and is basically an institution now, so it’s likely to continue to act as a good home for years or decades to come. There are many other options as well, google “Podcast Hosting” and pick one you like. The company you eventually choose is your “host”.
They will all have easy “How to set up a podcast” pages and videos to guide you. I will not repeat that information here, use the resources already out there. They’ll be more up to date anyway. [A] Take note of the RSS feed address that they give you (more on this in a second).
Later on, you will likely want to host your own site, as that will look better and will give you full control and ownership of everything you do. That will come after you have an audience and have decided you want to continue this project, don’t jump the gun.
4.b. Create a FeedBurner Feed
It is important to note that if your home changes, the address of your RSS feed changes. There is a long and messy process to update the address with all your listeners, which can disrupt the show, and which will often result in some listeners being lost. For this reason, the public-facing RSS feed should be separate from your home RSS feed. Your public-facing RSS feed will simply be a pass-through, taking all its data from your host’s RSS feed. You can change hosts a thousand times, and simply change where your public-facing RSS retrieves its data. All your listeners will continue to pull from your public-facing RSS and never notice anything happened behind the scenes. This level of control is really important.
The best way to do this is to create an RSS feed on FeedBurner. I won’t duplicate those instructions, google “How to create a FeedBurner feed.” Once that’s done:
1. Click the Feed Title for the feed you want to update
2. Click Edit Feed Details… at the top of the page
3. Change the Feed Title to the title of your podcast
4. Change the Original Feed to the RSS feed given by your host when you set up your podcast in [A] above
5. Change the Feed Address to anything you like, usually your podcast title without spaces, or an abbreviation of your podcast title.
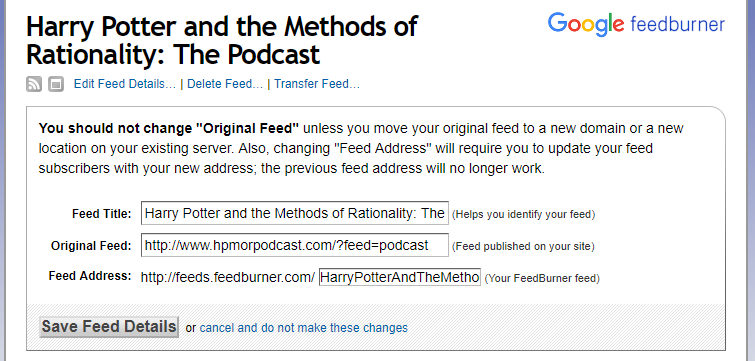
You will always use the Feed Address from step 5 when iTunes or any app or service asks for your RSS Feed. It is your forever. If/when you change hosts all you have to do is change the Original Feed field as specified in step 4. Everything runs smooth as butter.
Note for the future: Once you do want your own website, your best option is to find a WordPress host. I use DreamHost, they’re responsive and affordable (although, of course, not as affordable as LibSyn). You can google “WordPress Hosting” to find a different one if you like. Then google “How to set up a WordPress site” for help on doing that, I won’t duplicate that info here, and yours will be more up to date. You’ll need to use a WordPress plugin to publish on your own site. I use BluBrry, as it is free, reliable, and provides download stats. It is the most popular podcast plugin for WordPress at this writing, but if that changes in the future, google “WordPress Podcast Publishing Plugin” to find one. The plugin will have an up-to-date guide to tell you how to use it, which I won’t duplicate here.
4.c. Register with the big podcast sites
Now that you have an episode and an RSS feed, all you have to do is get your podcast into the hands of your listeners. At the time of writing, over 60% of all podcasts are downloaded through iTunes, so that’s still your go-to. Follow the instructions iTunes has on their site for publishing a podcast. You will likely need some art. When asked for your RSS feed, GIVE THEM THE FEEDBURNER ONE, not your host’s. This will save you so much headache later.
Repeat this process for any other services you like, such as GooglePlay or Stitcher. Make sure that the RSS feed that shows on your home page is the public FeedBurner one. Make sure you have a link to your RSS feed on your home page, so people that use their own niche podcatcher can subscribe to you.
Never pay anyone for this. You are providing them with free content already. iTunes will not ask for money, nor will GooglePlay or Stitcher. Anyone who does is likely trying to scam you. (Unless the future is very different from the present.)
You are now set. Every time you create an mp3 file and upload it (either using a publishing host like LibSyn, or hosting yourself with WordPress and using a publishing plugin like BluBrry) the episode will be pushed out to everyone who has subscribed to you (whether it be via iTunes or other). You are podcasting! Congratulations!
5. Final Tips (bonus section!)
Second to last tip – pick a schedule you can keep, and keep it religiously. Your listeners will forgive you if your late once in a while, or miss an episode, but for the most part you should be regular as a clock.
But the biggest piece of advice – realize that you will get better. And the only way to get better is to keep doing this. So don’t give up! You’ll never learn how to walk if you’re unwilling to wobble around like a flibbity-jibbit for a few months, figuring out how these “leg” things work. :)
Sorry, the comment form is closed at this time.